Monday 31 October 2016

Reflection and Framing Image Bank

Reflection

I chose this picture because I think it shows reflection well because the puddle produces a reflection of the building next to it. I chose this image because I like the puddle effect and there is not a lot going on in the picture which helps us focus in on the main aspect. Also, I think the colours helps in this pictures because the blues make it seem brighter and draws us in. From this image I can take the use of the puddle and the angle that it is taken at. I can use this in my work by using a reflection in a puddle from a building or another object also I can use the angle that this is taken at by making the reflection more visible.


This image shows reflection well because although we cannot see the clear reflection in the persons eye we know that a reflection is there because of the lighter area we can see. I chose this picture because I think that it is a good idea as they have used the human form to try and create the reflection. I can use ideas from this image in my work because I can take pictures of people's eyes to try and focus in on the reflection that we can see. Also, this picture can help me think of better things to take pictures of and think about things that I wouldn't originally have thought of when linking it to reflection.


This image shows reflection well because the puddle that can be seen is presenting the mans and the buildings reflection well. I chose this image because I like the way that although he is taking the photo he is also incorporating himself in his own photo by being in the reflection of the puddle. I also like how there isn't much going on around the puddle but when you focus in on the puddle there is a lot going on and more to focus on. 


This image shows reflection because we can see the building being reflected onto the table. I chose this image because I like how we are drawn to looking at the table. I also like how the rest of the image is boring and dull but when you look into the table it makes the picture more intriguing. I can use ideas from this photo in my work because I can form reflections in different places that we wouldn't think of straight away. 


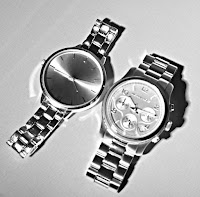
This image shows reflection because we can see the hand being reflected into the mirror. I chose this image because I like that it isn't a whole person being reflected in the mirror which is what would normally happen. I like that it is someones arm and hand but you can't see the rest of them, it draws us in because we want to see what the person is like, we want to put a face to the hand. I can use ideas like this in my work because I can reflect different things in the mirror that we wouldn't think of straight away.

Framing


This image shows frame because the hands are creating a frame and almost directs us into the focus of the image. I choose this image because I liked how the hands are acting as a frame and we can see clearly what the camera has focussed on. I also like the contribution of the sun in this image because it makes us feel welcomed into the picture. We are also welcomed into the picture by the way the hands are showing a heart which symbolises love. I can use ideas like this in my work because I can get someone to make shapes with their hands and focus on what is in the shape. 


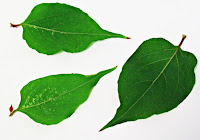
This image shows frame because we focus on the tree and the landscape that we can see inside the frame. I chose this image because I like the way that we can see what is inside the frame but we can also see what is around the frame. This helps us be drawn into the middle of the frame because the outside is boring compared to what is happening inside the frame. I can use ideas from this image because I can get someone to hold a frame and focus on what is going on inside the frame.


This image shows frame because we can see what is happening inside the wing mirror clearly. This can be seen as a frame because we are only drawn to what is happening in the frame rather than what we can see on the inside. I chose this image because it isn't like any of the other pictures that incorporated frame. I like that we can see what is behind us because it is a mirror. As well as frame this can also incorporate reflection. I can use ideas like this in my work because I can take pictures in cars wing mirrors. 


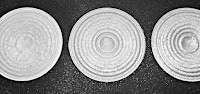
This image shows frame because we are focusing in on the shapes of the windows and what we can see out of them. I chose this image because I liked how there is 3 windows together showing the view. Although there is 3 windows when we look at them they all merge into one because we focus in on what we can see through the windows rather than the windows themselves. I can use ideas like this in my work because I can take picture through windows and focus on what is on the outside.


This image shows frame because the shape of the gate acts as a frame to focus in on the building. I chose this image because I like how everything outside the shape is blurred but the building which is the main focus in clear. The fact that this image is in black and white make us think more about the image such as whether it is from a long time ago or is it a modern picture. I can use ideas like this in my work because I can take pictures of something through a shape and make the camera focus just on what we can see through the shape.

Reflection and Frame Definition


Reflection
The throwing back by a body or surface of light, heat, or sound without absorbing it. Reflection is an important 
consideration in framing a composition and establishing balance.
Rule of thirds
It affects the ratio (1:1.618) of a picture size, as well as the placement of the main subjects in the photo. This ratio is close 
to the 35mm ratio, so you don't need to change the size of the photo in most cases. But you need to consider the 
composition: main subject should lie on one of the four lines or four intersections.


Golden Ratio
In nature we see the golden ratio in plants and the branching of trees, the spirals of shells, the curves of waves, 
in our DNA and the solar system. It has also been used in architecture, art and music. Simply put, the golden ratio 
is a ratio of approximately 1.618 to 1. This proportion creates a sense of harmony and balance. Below see 
how Cartier-Bresson used the proportions of the Golden Rectangle to form his composition.


Surrealism
Surrealism is a style of art and literature developed principally in the 20th century, stressing the subconscious or 
nonrational significance of imagery arrived at by automatism or the exploitation of chance effects, unexpected 
juxtapositions, etc. This photo is an example of surrealism because our minds don't understand this image at first 
but then we begin to realise and understand how this image works. This image uses a reflection to crete 
surrealism. 


Framing
Framing is the technique of drawing attention to the subject of your image by blocking other parts of the image 
with something in the scene. The benefits of framing pictures include giving the photo context, giving images a 
sense of depth and layers, leading the eye towards your main focal point and intriguing your viewer. This image 
shows frames because we focus on what is in the middle of the picture. The frame of the window helps us focus 
in on the trees and the view.


Sunday 30 October 2016

Shape Work Diary

Evaluation
On the topic of shape I took several images, some of them turned out the way that I wanted but some of them didn't work the way that I wanted them too.


I think this is one of my best images because the shapes are clear in the image. The way the darker colours on the palette are situated at the front show that the image almost gets lighter as you look into it. I like this image because it doesn't just represent shape but it also incorporates myself in the image as it is my palette. I like that I can incorporate things of my own in my work, this is almost like the shapes that fit together to show my personality and features. To edit this image I think I should saturate the colours to make them stand out a lot more.


I think this is also one of my better images because the shape of the keys is shown well as they appear 2D instead of 3D. Also the way that the beginning of the image isn't in focus and neither is the background but the middle part is in focus, this adds great effect because it makes you focus on the keys more in the middle where they are more important. To edit this image I think I should sharpen it to make the keys more visible and the unfocused ones to stand out a tiny bit more. Also, in this image I think I should've zoomed out a bit more and incorporated more of the keys in my work. 


I think this is one of my not so good images because the shape is visible but not in the way I would've liked it to be. I wanted to try and capture the shape of the plug socket because it is 2D but the angle of the image doesn't do it any justice. If the angle of this image was better and more central then it would've turned out as I expected. Also, the lighting isn't that good either because there is a shadow going across the middle of the socket so maybe if I had used a flash this would not have happened.

Progression
To progress my images I put them in Photoshop and edited them the way that I thought would progress them well.


To edit this image I made it black and white and sharpened the image. By making the image black and white colours that we present in the original image wouldn't be distracting and we would be able to focus just on the shape. By sharpening the image we can focus in more on the shape of the logo because it becomes more bolder. I think the edited version of the image is better than the original because everything becomes more clear and the shape can be focused on more. To progress this image more I could've zoomed in more on the logo.


To edit this image I made it black and white and sharpened it. By making it black and white the bagel is the same colour so the shape is more clearer and by sharpening it the shape also becomes clearer as the edges become more sharper. The edited version of the image is better because shape is clearer and instead of focusing on the colour which is mire existent in the original image we can focus more on the shape in the edited image.


To edit this image I made it black and white, cropped the image and then sharpened it. By making it black and white the colours are not visible so it doesn't take out attention away from the shape, by cropping the image the excess space that is in the original image doesn't exist in the edited one and also by sharpening the image the shape of the faces stand out more so we can focus more on their shape. To further progress this image I think I should've gotten close to the watches so that I wouldn't have to to crop the image.


To edit this image I made it black and white, sharpened and cropped it. By making the image black and white the colours of the various powers cannot be established so we refrain from focusing on the colours because in black and white they all look the same. By sharpening it we can see the shape more clearly as the edges appear more smooth. By cropping the image again we can focus in more on the shapes rather than anything else. I think the edited version of this image is better because there are no distractions from shape in the edited one. To progress this image more I could've maybe taken pictures of the powders individually.


To edit this image I made the image brighter, sharpened and cropped the image. By making the image brighter it is more clearer because in the original image it is quite dull. By sharpening the image the shape of the leaf becomes more clearer and by cropping the image we focus on the leaves rather than the excess white space. The edited version of the image is better because it is clearer and draws us in more. To progress this image more I could make it black and white so the colours don't take away the effect of the shape.

Next time if I get a chance to take pictures relating to this topic I will progress the images further to make them better.

Shape Straight Images


I took this image because I think that it represents shape well. In this image there are several different shapes the main one being the clock face, the numbers also count as shapes along with the hands of the clock. I like this image because it doesn't show the clock face on it shows it at a different angle. The focus of this image has also worked well because the top end of the image is more in focus than the bottom of the image, this creates a better effect than if the whole image was in focus.


I took this image because of the several shapes included in it. The circles of the powders show shape but also the several different circles incorporated in the powders. I like this image because the focus of the image works well as the whole image is in focus. The angle of this image is also good because if I was any closer all the powders wouldn't of been seen and if I used a wider angle then other things would've appeared in the image. 


I took this image because it includes more than one shape, the bagel itself counts as a shape but the ring inside also counts as a shape. I like this image because it looks like it has been taken in a studio but it hasn't. The flash of the camera helped get such a clear image. I like that the image is so clear and it doesn't include anything else in the image. The focus of the image has helped here because if this image wasn't in focus it wouldn't have had such a big effect. Although this object isn't 2D the direct light hitting it makes no shadows so it doesn't look 3D.


I took this image because the watch faces showed shape. I like this image because the watches together have a big effect because they are both different but the same features on them show shape. The light hitting the objects create a big effect too because it brightens the face which helps it become clearer so we can establish the shape.  I think this image could've been zoomed in more slightly because the actual watch faces are not clear enough.


I took this image because the apple sign is 2D so it shows shape. I like this image because you can play around with it a lot in Photoshop when I come to editing my pictures. I think the lighting in this image could've been improved because it is a bit too dark, if the image was lighter I think that it could be a better picture. I also could've incorporated more in this image that relates to shape such as several other apple products showing their logo.

Wednesday 26 October 2016

Tone Work Diary

Evaluation
In my work I have tried to incorporate the main topic tone in each of the images. Some of the images have turned out the way that I wanted but others haven't incorporated as much of the idea of tone as I would've liked. 


This image uses natural light to show tone because the way the sun is hitting the trees only one part of the tree is lit and the other parts are in darkness. The lighting is much more softer in this image because the shadow is less harsh. I think this image is one of my better ones because it shows tone well using natural light. The angle of the camera worked well because if it was closer then the shadows of the bottom of the tree would not have been captured as well, if the angle was wider the image would've included unnecessary objects. To progress the image I could edit this image and make it black and white to show the tone more so the shadows appear darker so the lighter parts stand out.


This image uses harsh lighting to show tone because the way the light is hitting the object we are able to see the shadow behind the objects. The shadow is much more harsher because the light is very bright as it lights up the whole left side of the object. I think this is one of my better images because it produces tone well because of the lighting that I have used. The angle of the camera has worked well too because the shadow is clearer so we can see the darkened and lighter areas. If the camera was closer these parts would not be visible and if it was further aways it would be less clear. To progress this image I think I could edit it in black and white to make the shadows more darker.


At first I wasn't too sure about this image but when you look further into the image it almost tells a story. I didn't like this image because 

This image was less effective than I hoped it would've been. It doesn't really reflect tone in the way I wanted. I was trying to get the lower part darker than the top part so the lighting would decrease as you got lower. To improve this I could edit it to make the lighting decrease as you go down. Also I could've take the image at a different angle or maybe use a different set of stairs to grasp the tone effect. Next time if I was using the same topic I wouldn't of taken this image because it doesn't really represent tone at all.

Progression
To progress my images further I used Photoshop to edit the pictures to increase the tone effect.


To edit this image I made it black and white and then sharpened the image. I think the edited image is better than the original image because the shadows on the left side of her face is more visible and the lighter parts appear more brighter. As the image has turned black and white you would expect the image to appear duller but the black and white gives it more meaning and helps the tones appear more visible. 


To edit this image I made it black and white and then sharpened the picture. I think the edited version of the image is better than the original because the black and white gives it more meaning. Also, it helps the light and dark areas stand out more so the tone is more visible. The image appears better in black and white because the different shades helps the tone stand out more. 


To edit this image I made it black and white and then sharpened it. I think the edited version is better because the shadows appear darker and bolder. By sharpening the image it has almost made the controller appear unrealistic as if it was virtual, this corresponds to the meaning of the object as it is a game controller. The image appears better in black and white because you only focus on what the picture looks like rather than the colours in the image.


To edit this image I made it black and white, sharpened it and also increased the contrast. By editing the photo in this way it has made the sky stand out more but in a different way to the original picture. In the image the tone decreases as you get further into the image because the back of the image is lighter than the foreground. The sky stands out more in the edited image because it appears darker, by changing the sky it changes how we see the weather which can also link to tone.


To edit this image I made it black and white and sharpened it. By editing it in this way it has made the shadows of the objects stand out more therefore making the tone more visible. The original image has colours which distracts us aways from focusing in on the tone of the image, the edited image helps focus on the tone. I think making the image black and white helps the lighting become more visible so the harsh lighting can be seen better.


To progress this topic on I would use various improvement and try to use different ideas in my work. 

Shape Contact Sheet


Tuesday 25 October 2016

Tone Straight Images


In this image I used lighting from all angles to produce light all over. This creates a welcoming tone because the lighting is bright and doesn't create any darkness in the picture. I think this lighting is very feminine because it lights all areas of the face unlike masculine light which darkens some areas. I think the lighting in this image is the  main feature because if it was darker it wouldn't create the same effect. 


In this image the natural light creates tones. The natural light creates a bright tone and is welcoming as there is no dull parts in the image. The natural light helps creating tone because if it was dark the tone would be different but because it is bright the sky looks bolder. In this image the main focus is the sky because the houses underneath are slightly duller than the sky.


I used harsh lighting in this image by placing a light at the left side to create the contrast of light to dark. This doesn't create a welcoming tone because the lighting is very intimidating, if this was person it would make you not want to go near that person. The controller also has tones because the camo effect has light and dark tones. The angle of the photo also has created tone because the way the camera is positioned helps us see the shadow that is created.

I also used harsh lighting in this image too. From the image we can see that the lighting is coming from the right hand side because the right side of her face is lit and the left side is darker. The harsh lighting is very masculine because it focuses on one part of the face whereas if I used feminine lighting it would light all areas of the face. This image shows dark tones because of the black colours, the dark colours make her face stand out more. Also, the fact that the camera angle is not zoomed in gives a better effect, the darker side of the face is more visible when the camera is further away.


I used natural lighting for this image. The natural light creates a shadow behind each of these objects. The bright colours in the image change the look of this picture because if it was dull or black and white the picture wouldn't be as intriguing. From the image we can tell that the light is coming from the right hand side because the shadows that are being produced are laying towards the left side. Although this is natural lighting it it still harsh lighting because only certain areas are lit and the other areas are darker.